From JetBrains to Vim
A walkthrough detailing a Vim setup aimed at emulating the most-used features from JetBrains IDEs.Posted on
- Background: Why do this at all?
- Vim configuration
-
Plugins
- Plugin manager: Vim Packager
- Fuzzy finding and search: FZF
- LSP Features: LSP
- Linting and Fixing: ALE
- QOL feature 1: Auto saving
- QOL feature 2: Auto pairing
- QOL feature 3: Git modification indicators
- QOL feature 4: Statusline
- QOL feature 5: Testing
- Colorscheme
- Bonus 1: Better syntax highlighting
- Bonus 2: File tree
- Bonus 3: Remapping cheat sheet
- Wrap up
- Further reading
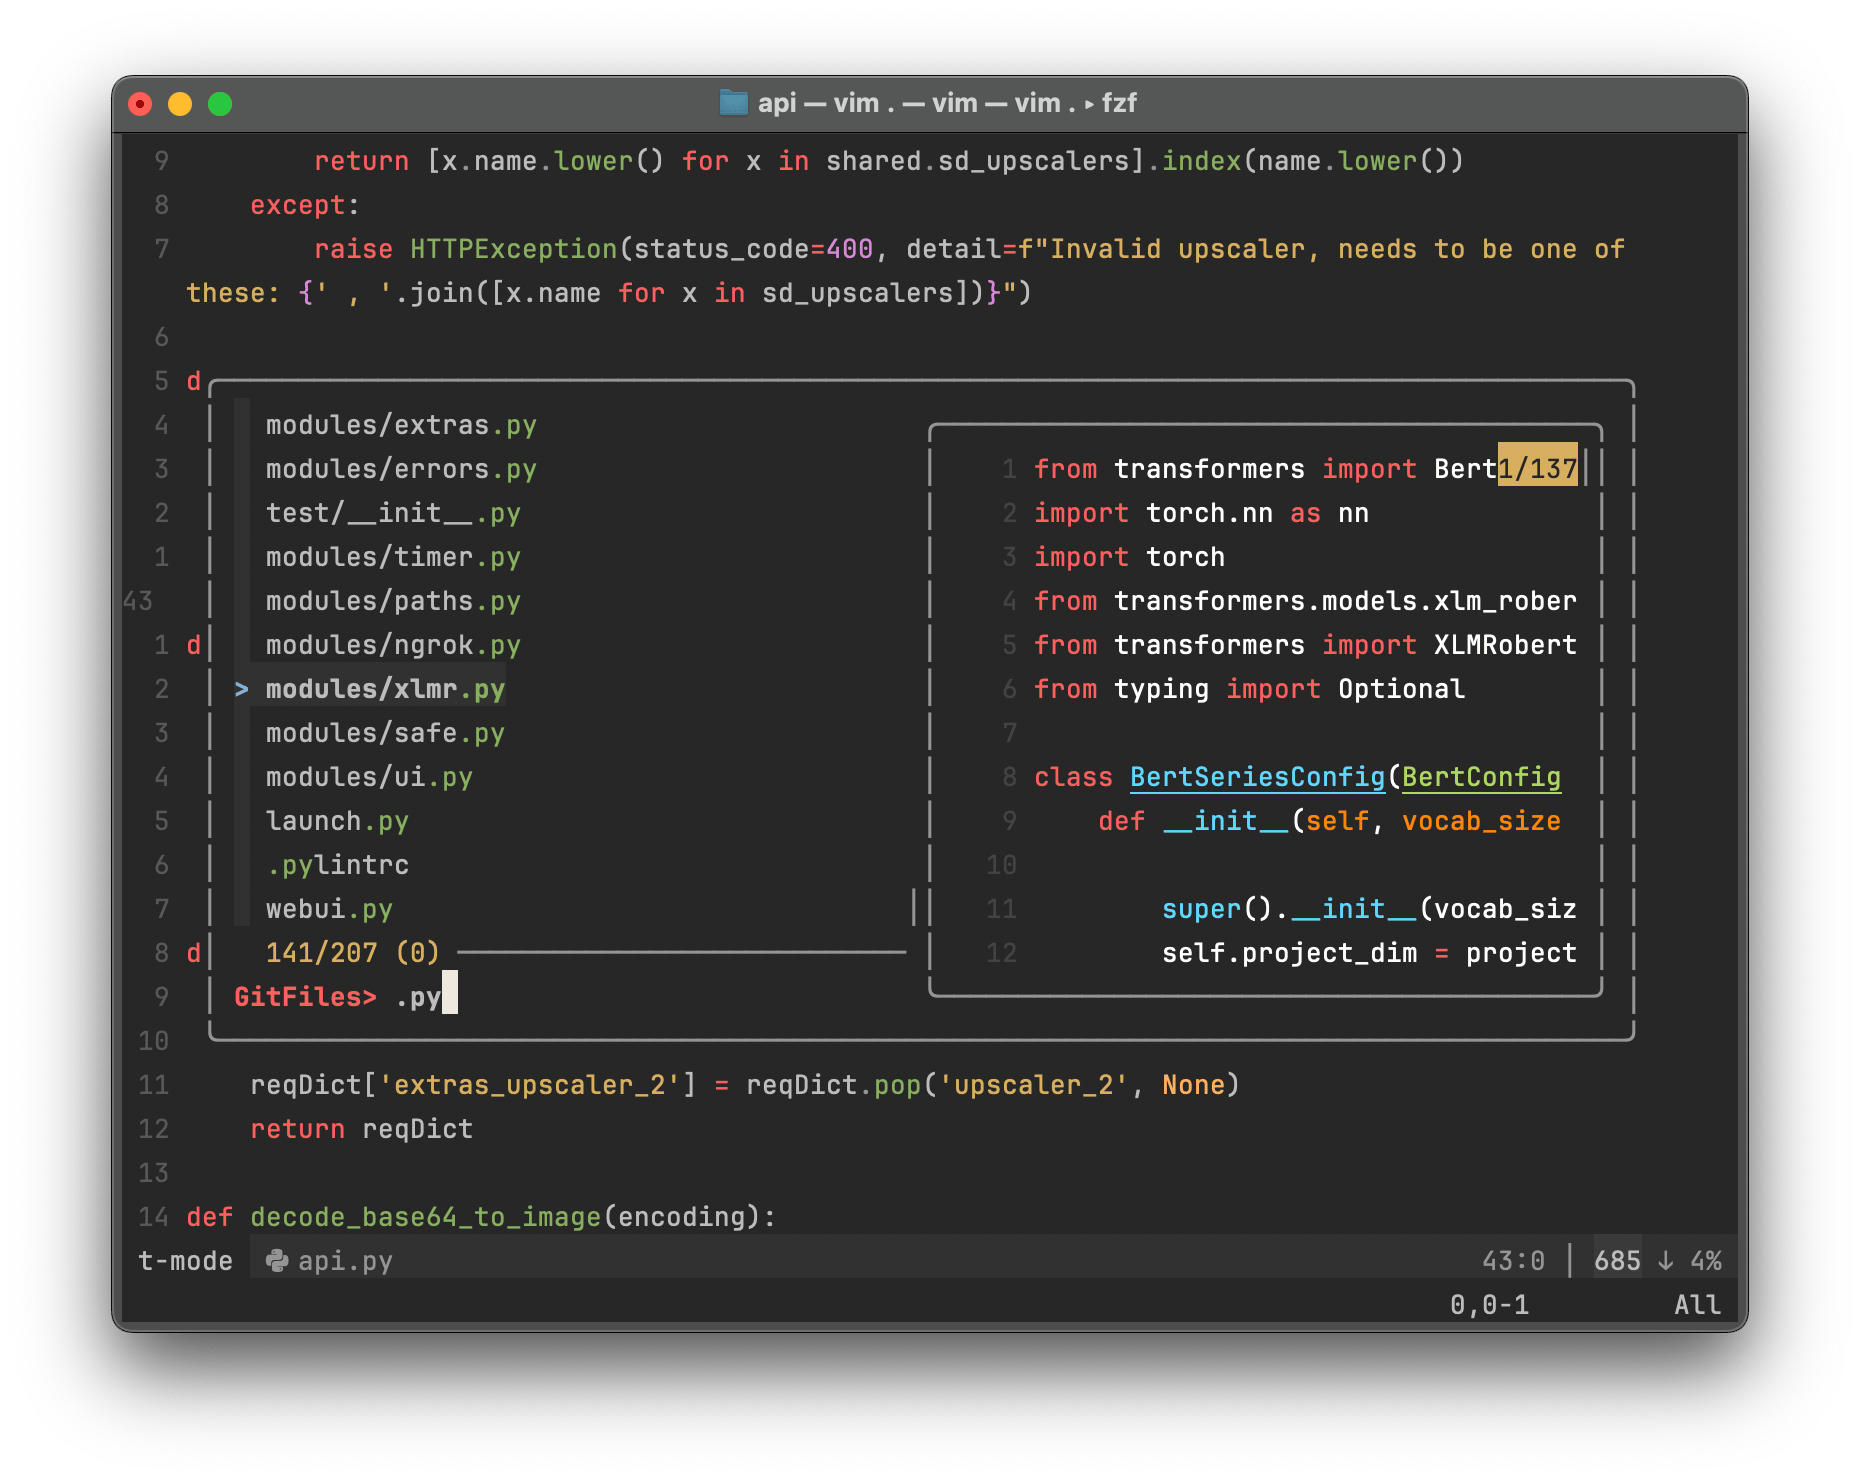
Short on time? Skip straight to the configuration!
Background: Why do this at all?
I have been a long time user of JetBrains IDEs. As a Go developer primarily, I found early in my career that GoLand offered a much improved and polished Go coding experience than VSCode at the time. Ever since, I have been a JetBrains advocate for all of my development, regardless of language. They have a fantastic suite of products which enable a fast and painless workflow, and manage to keep the cognitive load low even when working on major refactors of large projects - a task that could span weeks of development time and a great many files.
Recently however, in the wake of the death of it's creator Bram Moolenaar, I have decided to take a look at Vim. As such, I spent a while learning the most basic Vim motions, and read through Drew Neil's Practical Vim until I was comfortable enough using the editor without getting stuck.
Vim users promise a workflow speed like no other by embracing Vim's usage patterns; a sentiment I will try to at least ideologically adhere to, however, in order to keep my productivity up to at least a similar level as with my JetBrains IDEs, the Vim setup we will describe shortly attempts to recreate a selection of my most-used, more modern features from JetBrains in Vim.
(Before anyone mentions, I am aware that you can put vim motion plugins into JetBrains IDEs and keep their benefits, or alternatively get much of the desired functionality as standard with Neovim. Vim just seemed more of an interesting challenge to me! That being said, I would recommend others trying to move to vim to follow that first approach and use a Vim motion plugin for a bit before swapping editors.)
Vim Overview: What is Vim anyway?
One thing Vim decidedly isn't, is an IDE. Vim is a text editor. It has a rich and active developer community with a ton of plugins aimed at extending its capability far beyond that simple task, and it's these plugins we will leverage to bend Vim to our advantage.
From my initial investigation, the feeling was that trying to make it behave like an IDE will give you the worst of both worlds. An obvious thing that Vim has over big IDEs such as those from JetBrains is it is lightweight, and as such can be extremely fast, even with many files. Using too many heavy plugins will remove this advantage, so I decided try to consciously stick to plugins that have minimal performance impact in mind.
Learning how best to utilise these plugins required a bit of learning: since Vim isn't an IDE, many of the functionalities that are bundled into IDEs have to be understood and incorporated on their own - functionalities I hadn't considered as separate even, because I hadn't had to consider them at all.
Language functions: There's more going on than you think!
Say you're writing some code in an IDE. You're calling some function you defined elsewhere in your source. You most likely will have undergone the following familiar pattern:
- Write the function call. The IDE guesses at the function you want to write based on the initial characters; you accept it's suggestion and save yourself a few keystrokes.
- Fill in the parameters of the function. Perhaps you accidentally put a
stringvalue for a parameter that is defined to be anint. The IDE underlines your input, informing you of your mistake. - You right click on the function name in order to jump to the file where it is declared, and see
that yes, it is expecting an
int. - You quickly switch back to the original file and modify the call. The IDE tidies up the indentation and closes your brackets. You continue with your day.
All a very natural interaction with your editor. I would, in the past, lump the sum of the IDE's involvement under the term Auto Completion. However, there are a few different processes at play here, handily bundled together and hidden from view by the IDE, namely: Linting, Fixing, and Auto Completion, which can be, but doesn't have to be, a subset of a few Language Server Features, also present. Lets see how these tie into our microcosm of coding above.
In step 1, we see an example of auto completion. This is the process of suggesting values for what is intended to be typed. These are often provided by a Language Server, which offers up relevant values (such as fields of a function or methods of a class) to a Language Client according to it's understanding of the code semantics. This requires client and server follow the Language Server Protocol (LSP). In your IDE, server and client come as part and parcel of the download. In Vim, we have to explicitly implement them - see later.
Step 2 involves linting, whereby errors and style warnings in your code are caught, usually by the same or similar tool that compiles your code, and displayed to the user at the point of interest. This is different to fixing, which involves cleaning up these errors and codestyle deviations automatically, and is shown in step 4.
Step 3 is an example of another LSP feature, namely go to definition. The language server uses its awareness of the code to enable a navigation to the definition of the function.
Other IDE features: what else do they do?
So you see, even for that most basic seeming of IDE quality-of-life features, there is a lot going on under the hood in order for it to work. And that's only one small part of what makes working in an IDE so easy. When I use GoLand or PyCharm, I'm regularly using a bunch of useful inbuilt functionality, such as:
- Nice syntax highlighting of any language
- Git integrations: modified line and file indications in gutter and file browser
- "Refactor" options to modify all occurrences of a field, function, or class
- Test pane and test configurations to pass env vars through
- Terminal pane for testing programs and using command line git
- Debugger for stepping through code
Some of these we'll be able to set up satisfactorily in Vim, but some will remain a sub-par imitation of the smoothness of the JetBrains implementation.
Enough chat! Lets get on to the configuration and plugins!
Vim configuration
The configuration edits to Vim itself are fairly minimal. Here is the Vim-specific config section
from the top of the ~/.vim/vimrc file:
 "=== VIM SETTINGS ===================================="

unlet! skip_defaults_vim
source $VIMRUNTIME/defaults.vim

syntax enable
filetype plugin indent on
set hlsearch incsearch ignorecase
set number relativenumber
set encoding=UTF-8

if $COLORTERM == 'truecolor'
  set termguicolors
endif

let mapleader="\<space>"
nnoremap <leader>c :botright term<CR>
Lets step through each section.
First, the lines
unlet! skip_defaults_vim
source $VIMRUNTIME/defaults.vim
Prevents Vim from ignoring the defaults file, which it normally would do upon discovering a user's
custom vimrc. The defaults file contains a bunch of handy settings, including the ever-present
set nocompatible. Sourcing it basically saves several lines in the custom vimrc. Next,
syntax on
filetype plugin indent on
enables Vim's inbuilt syntax highlighting, and the running of file-specific autocommands according to the file being edited. This means Vim knows e.g. what the comment char is for the current file, as well as the indentation rules, and will apply them accordingly as you code.
set hlsearch incsearch ignorecase
set number relativenumber
set encoding=UTF-8
The first line here improves Vim's / search function to incrementally highlight matches and
ignore case differences. The second line adds a relative number row, preventing you from having to
count to know what number to prepend your l and h movements with. It also displays the current
absolute line number in the same row.
Finally we enable the use of unicode with set encoding=UTF-8.
let mapleader="\<space>"
nnoremap <leader>c :botright term<CR>
Our first remappings! Firstly, the leader key is set to be the space bar - this is up to personal
preference, some people prefer a key on or near the home row. The leader key enables us to set
custom shortcuts without fear of overwriting any existing vim keybindings. This is exemplified on
the second line, which remaps a pressing of the leader key and c to run the vim command
:botright term and then Enter, or as Vim knows it, Carriage Return, hence <CR>. The
nnoremap means the remap is defined in Vim's Normal Mode. See more info on modes
here.
Update: There is a better workflow for accessing the terminal whilst using Vim, one which simply
makes use of general shell commands: in normal mode, press Ctrl+z, which suspends the current
terminal task (Vim) to the background. You can then interact with your terminal, use git or install
a library etc, and when finished, use either fg %1 or just % to bring Vim back to the front.
This improves on the :terminal terminal as it will remember any activated virtual environments
between usages.
Plugins
At this point, we have a workable Vim setup. Many Vim purists would urge it is left there; far from it my place to say what the best approach is. All I know is I personally require a bit more handholding in my editor - those who do not can leverage one of the joys of Vim: the front-and-centre ability to customise it as much or little as desired. The additional features we choose to add next, and their configuration, will ensure we remain at least comfortable with mostly vanilla Vim should the need arise.
What I would recommend, is not to install all the plugins at once. Rather, install each new plugin one at a time, and take some time to play around with each one and learn their commands, both mapped and unmapped. This way you will not be overwhelmed and you will have a clearer picture of what options and commands are actually available to you.
Plugin manager: Vim Packager
Plugin: kristijanhusak/vim-packager
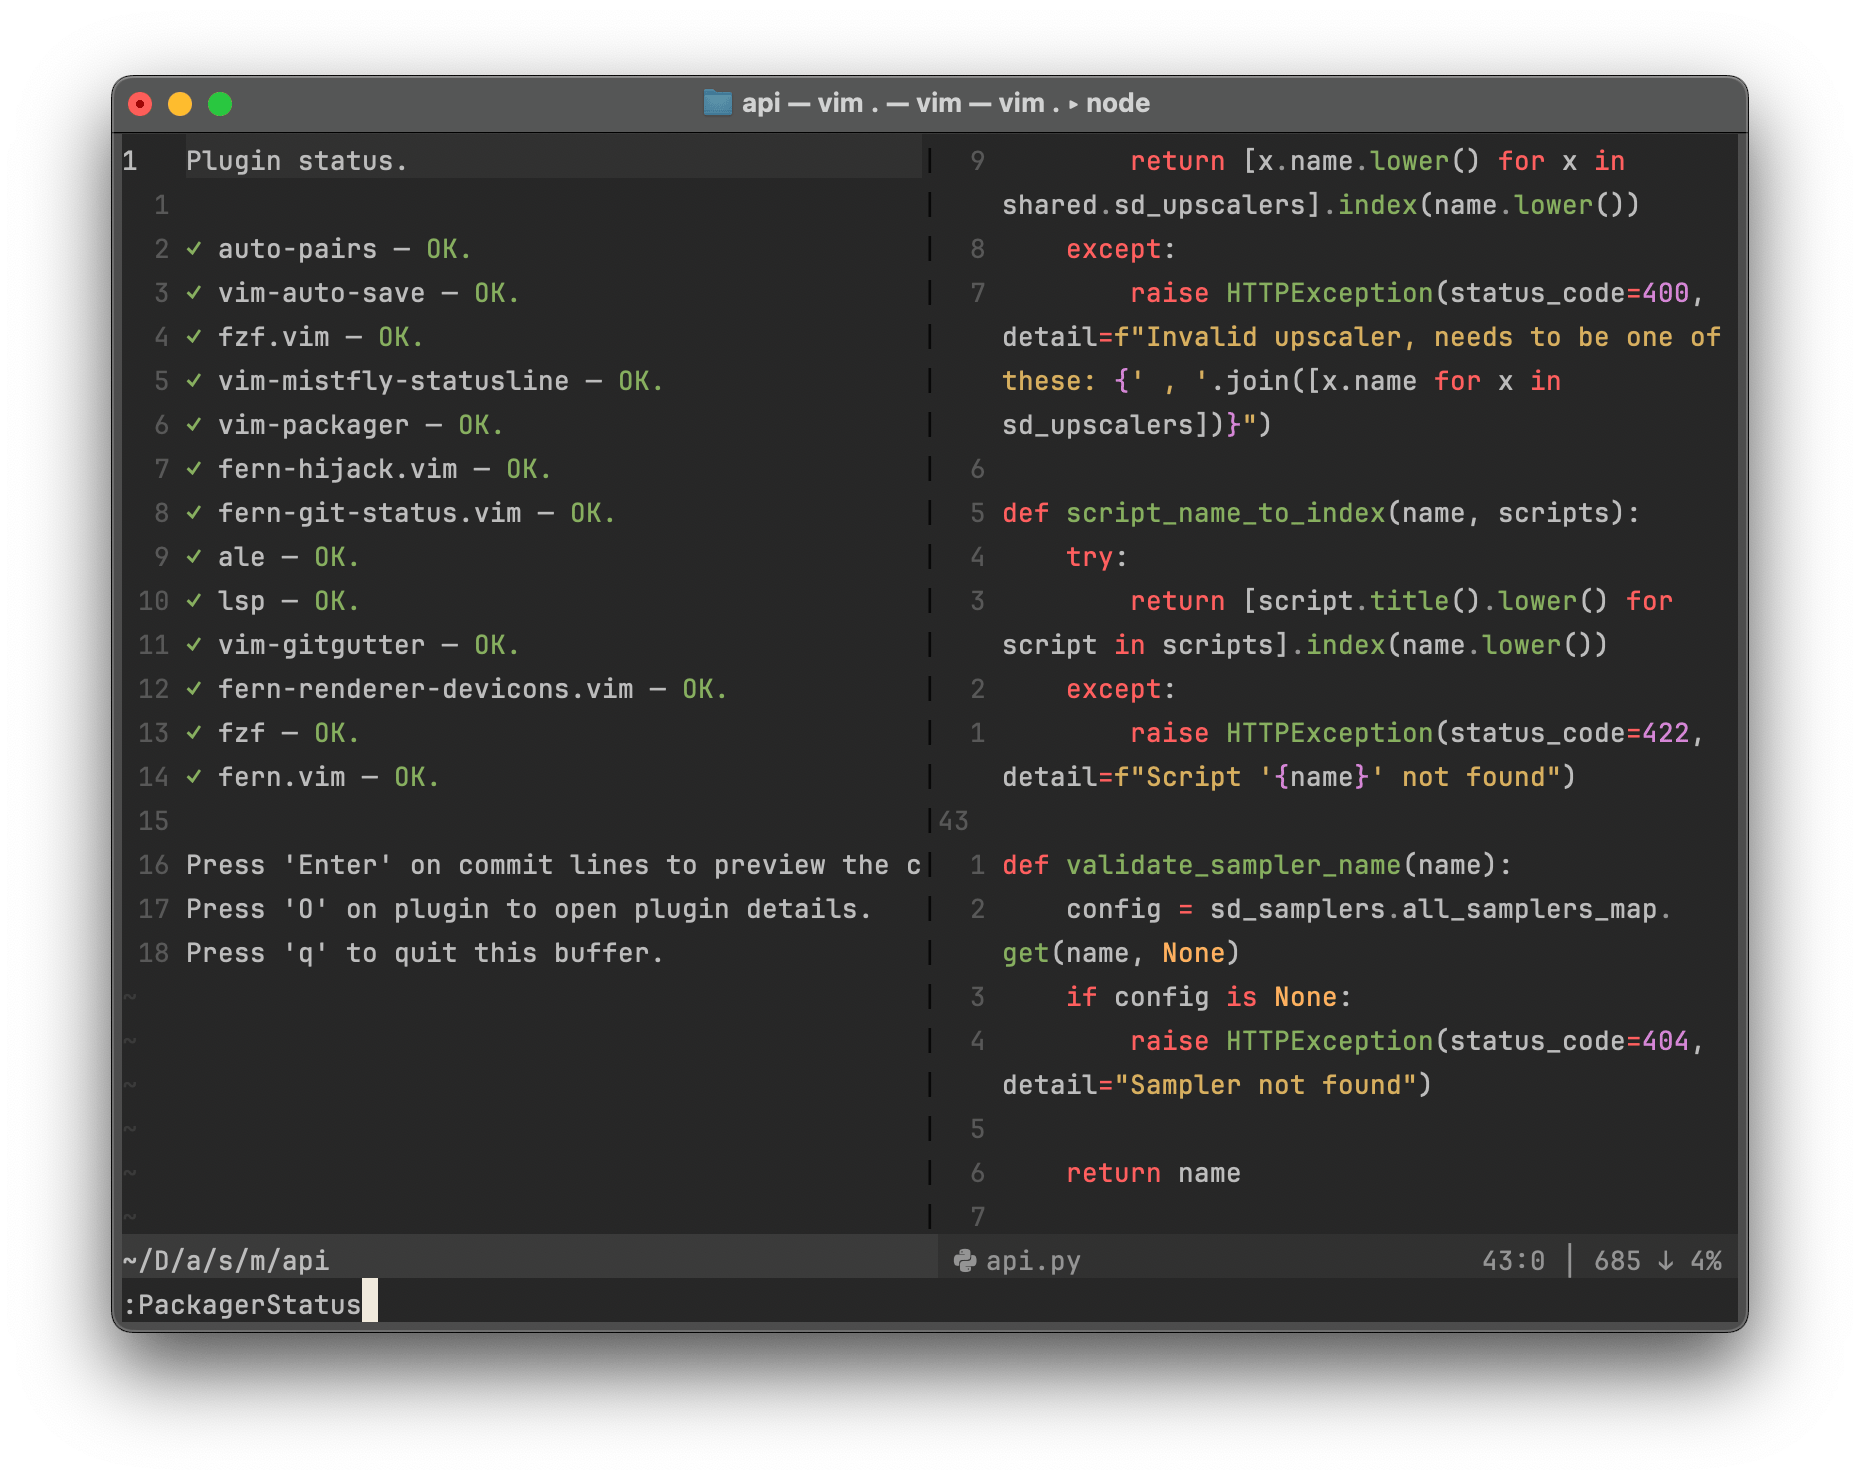
With Vim 8, native package management was included. By cloning the plugin directory into
~/.vim/pack/<whatever> Vim will pick up the plugin and automatically load it. However, since in
order to find my optimum plugin setup I would be installing, testing, and uninstalling many
plugins, I decided to save myself some manual labour and use a plugin manager - albeit one that
keeps a close tie to that inbuilt solution. I chose Vim Packager, as it's :PackagerInstall
command simply does the aforementioned cloning into the default package folder for you, whilst
:PackagerClean handles rm -r-ing unused plugin directories. As such, it is a very simple
wrapper on top of pre-existing functionality in Vim.
Adding packages with Vim packager is as simple as adding
packager) abort
call a:packager.add('some/plugin')
endfunction
packadd vim-packager
call packager#setup(function('s:packager_init'))
saving your vimrc with :w, sourcing it with :source ~/.vim/vimrc (or exiting and reloading
Vim), and running :PackagerInstall to clone all the plugins specified by a:packager.add()
calls within the s:packager_init function. For each code snippet below, the call a:packager.add
line should always be within that function block, and the rest below the entire packager
configuration. With that in mind, lets add our first plugin!
Fuzzy finding and search: FZF
Plugin: junegunn/fzf.vim

FZF is a fast fuzzy search for vim, invaluable for navigating both inter- and intra- file. This is
the first major deviation from usual IDE behaviour, as instead of relying on an always-visible
file tree to navigate a project and select files, we will utilise FZF's file search capabilities.
The plugin does not include the binaries, so be sure to install fzf and the-silver-searcher
(I use homebrew).
Add the packager calls into the relevant function, and then specify the additional config:
"In the packager function"
call a:packager.add('junegunn/fzf', { 'do': './install --all && ln -s $(pwd) ~/.fzf'})
call a:packager.add('junegunn/fzf.vim')

"Elsewhere in the vimrc"
"--- FZF settings --------------------------------"
nnoremap <silent> <leader>f :Lines<CR>
nnoremap <silent> <leader>F :Ag<CR>
nnoremap <silent> <leader>b :Buffers <CR>
nnoremap <silent> <leader>g :GFiles <CR>

"Map buffer quick switch keys"
nnoremap <silent> <leader><Tab> <C-^>
Exit vim (:wq), reload it (vim ~/.vim/vimrc), and run :PackagerInstall to download the
plugin and binary.
Here we have created four remaps for what I consider the most important FZF features:
- Search in-file:
<leader>f, akin to JetBrains'CMD+f - Search in all files:
<leader>F, akin to JetBrainsCMD+F, - List files:
<leader>g - List buffers:
<leader>b
The first two are self-explanatory with their JB counterparts, but the last two require a little
explanation. Firstly, rarely if ever will I code in a project that isn't a Git repository, so I use
the FZF :GFiles command over the :Files command as it respects .gitignore. Pressing
<leader>g will bring up a list of all the files in the repository which I can fuzzy search
through to my desired choice. You will find that this is a far more efficient file selection method
than searching within a file tree, and to choose a file I already had open, I can use the much
shorter buffer list via <leader>b. The final remap enables a more familiar key combination to
swap to the most recently accessed buffer, <leader><Tab>, like JetBrains' CTRL+Tab binding.
With a bit of practice opening files in this manner you'll wonder why you ever used up a third of
your screen real estate on a file tree.
Buffers are a blog post in themselves; I won't go into them here. Suffice to say that newcomers to vim will find more familiarity in using tabs for their files, but this behaviour should be discouraged in favour of buffers. This is why I have only created mappings for buffer-based commands.
Have a play with these mappings until their usage becomes familiar.
LSP Features: LSP
Plugin: yegappan/lsp
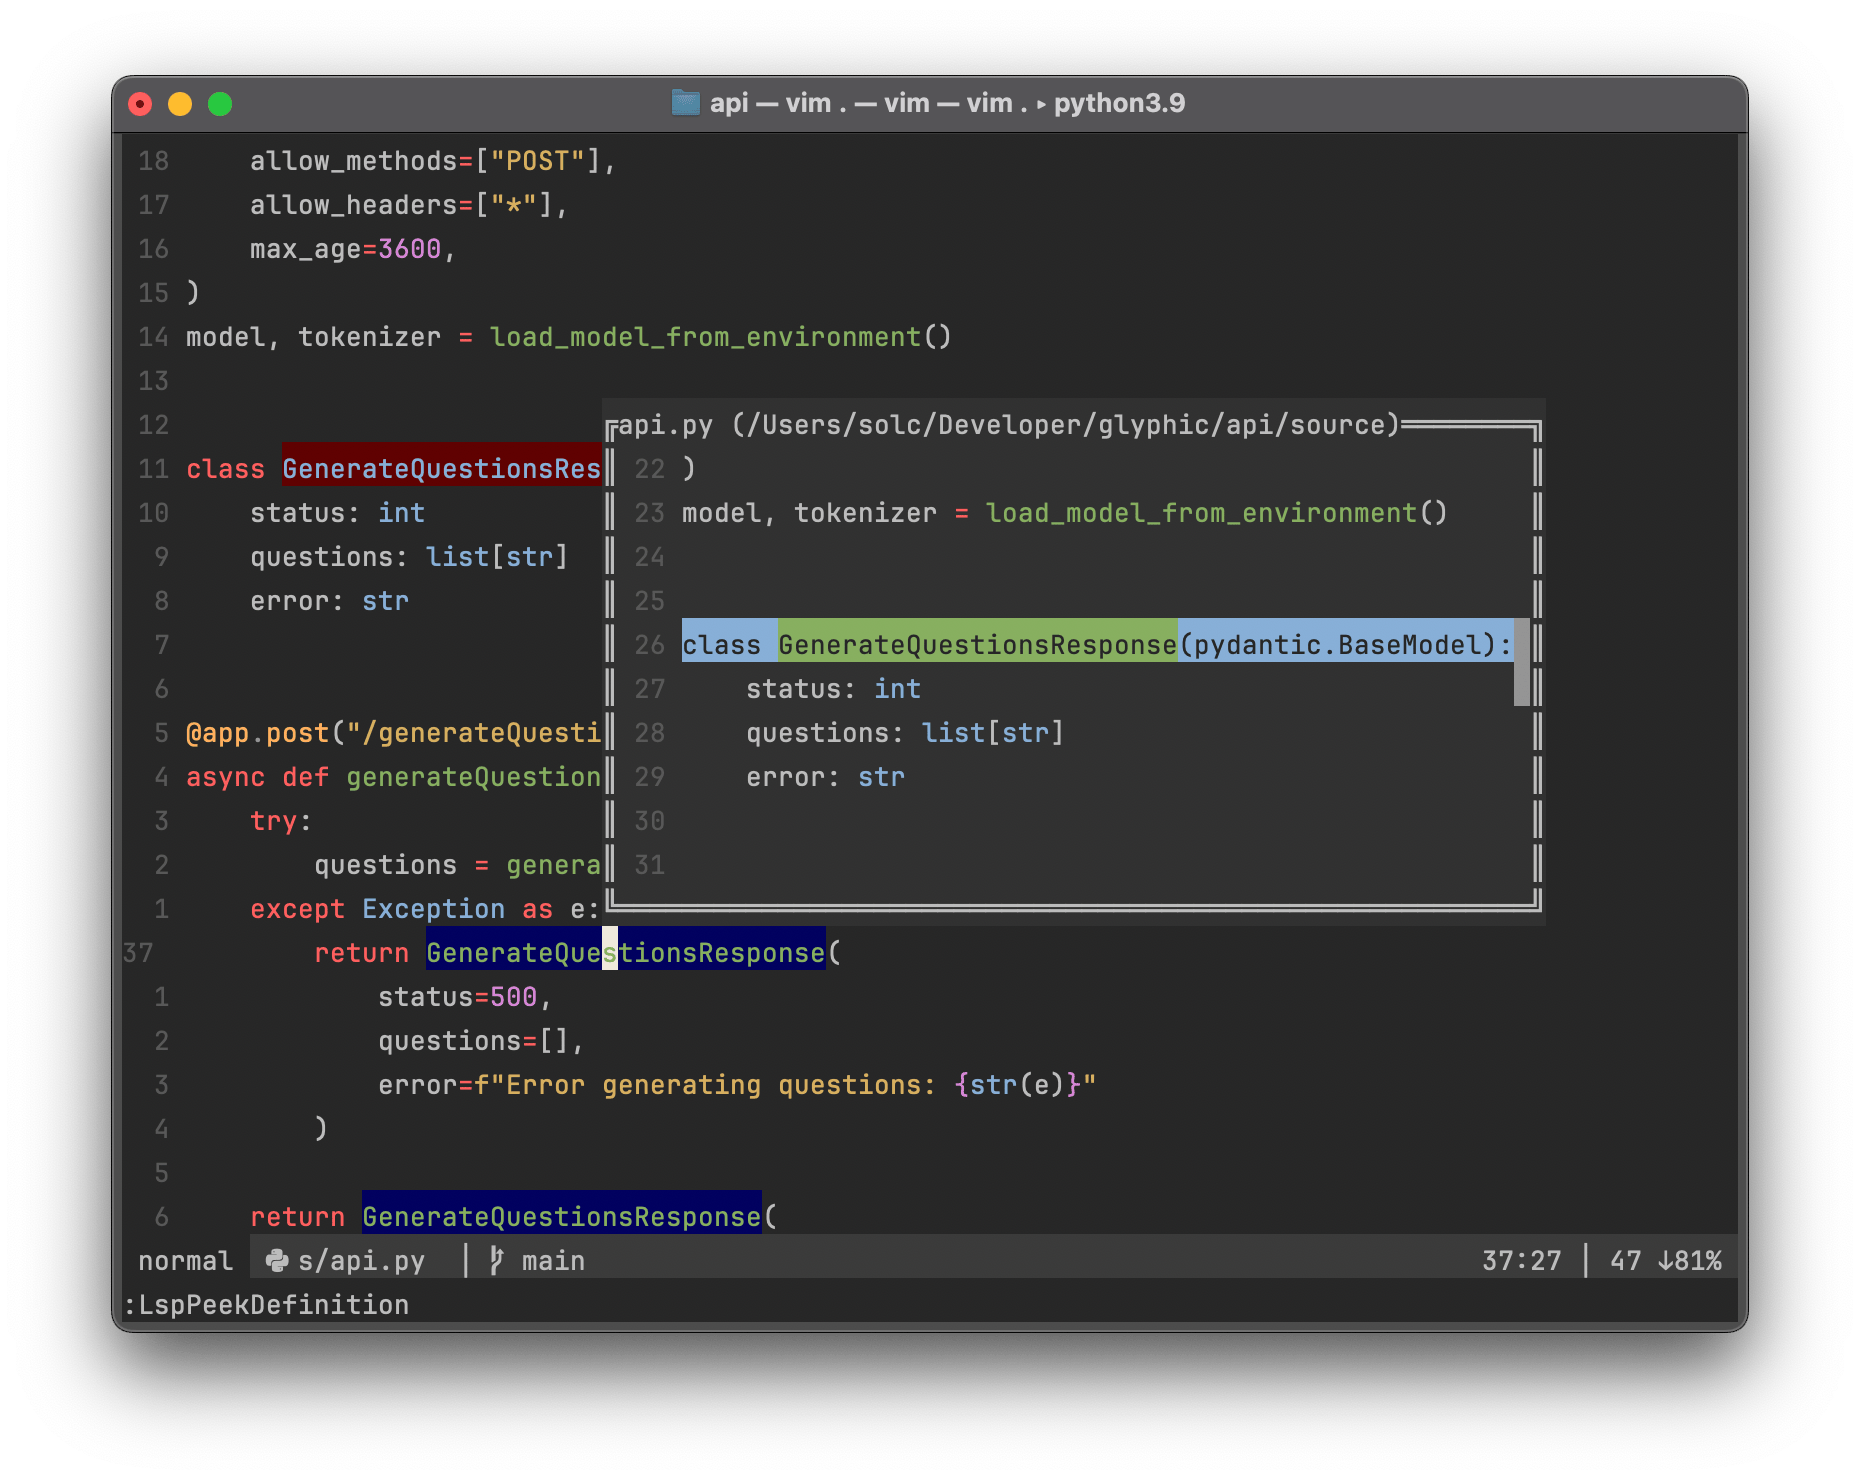
The first plugin we could point to to back up the "modern" adjective in the title, lsp is written
in and for Vim9, the latest major version of Vim at time of writing. This plugin is going to be
used to perform two of the four features mentioned above; Auto Completion, and LSP Features
(such as GoTo Definition, Rename, Find References). We incorporate it as follows, again
remembering to set the call line within the packager function at the top of the vimrc, and
running :source ~/.vim/vimrc then :PackagerInstall to clone the plugin:
call a:packager.add('yegappan/lsp')

"--- LSP settings ---------------------------------------------------"
let lspOptions = #{
    \ aleSupport: v:true,
    \ autoHighlight: v:true,
    \ completionTextEdit: v:true,
    \ noNewlineInCompletion: v:true,
    \ outlineOnRight: v:true,
    \ outlineWinSize: 70,
    \ showDiagWithSign: v:false,
    \ useQuickfixForLocations: v:true,
    \ }
autocmd VimEnter * call LspOptionsSet(lspOptions)

let lspServers = [
    \ #{ name: 'gopls', filetype: ['go', 'gomod'],  path: 'gopls', args: ['serve'] },
    \ #{ name: 'pylsp', filetype: ['py', 'python'], path: 'pylsp', args: []        },
\ ]
autocmd VimEnter * call LspAddServer(lspServers)

"Enable auto selection of the fist autocomplete item"
augroup LspSetup
    au!
    au User LspAttached set completeopt-=noselect
augroup END
"Disable newline on selecting completion option"
inoremap <expr> <CR> pumvisible() ? "\<C-Y>" : "\<CR>"

"Mappings for most-used functions"
nnoremap <leader>i :LspHover<CR>
nnoremap <leader>d :LspGotoDefinition<CR>
nnoremap <leader>p :LspPeekDefinition<CR>
nnoremap <leader>R :LspRename<CR>
nnoremap <leader>r :LspPeekReferences<CR>
nnoremap <leader>o :LspDocumentSymbol<CR>
There's a lot going on here! Firstly lets look at
let lspServers = [
    \ #{ name: 'gopls', filetype: ['go', 'gomod'],  path: 'gopls', args: ['serve'] },
    \ #{ name: 'pylsp', filetype: ['py', 'python'], path: 'pylsp', args: []        },
\ ]
From our discussion on the Language Server Protocol in the background section, you'll recall that a Language Client communicated with a Language Server to get information about a piece of code. Here we are defining the language servers that the plugin (the language client) will use, where on our computer the server binary is located, and what filetypes to use it for. Here we describe the servers for Python and Go, but many other languages are covered - see the lsp wiki for the full set and their configurations.
Note that this plugin does not install the servers, you have to do that manually.
"Enable auto selection of the fist autocomplete item"
augroup LspSetup
    au!
    au User LspAttached set completeopt-=noselect
augroup END
"Disable newline on selecting completion option"
inoremap <expr> <CR> pumvisible() ? "\<C-Y>" : "\<CR>"
These lines are described with comments; they basically make the autocompletion menu behave more
like the one we are used to in JetBrains IDEs: allowing for item selection with <CR> and always
highlighting the first completion option.
let lspOptions = #{
    \ aleSupport: v:true,
    \ autoHighlight: v:true,
    \ completionTextEdit: v:true,
    \ noNewlineInCompletion: v:true,
    \ outlineOnRight: v:true,
    \ outlineWinSize: 70,
    \ showDiagWithSign: v:false,
    \ useQuickfixForLocations: v:true,
    \ }
autocmd VimEnter * call LspOptionsSet(lspOptions)
These lines describe the plugin-specific configuration, documentation for which can be found in
the plugin's doc/lsp.txt file,
accessible in vim with :h lsp-options. These again are to preference, but the most important
one here is the first one: aleSupport: v:true. This allows us to pass off the linting side
of things to a dedicated plugin, in order to keep logical separation of functions and ensure we are
using the best tools for each task. That plugin is called ALE, and we'll look at it in a second.
"Mappings for most-used functions"
nnoremap <leader>i :LspHover<CR>
nnoremap <leader>d :LspGotoDefinition<CR>
nnoremap <leader>p :LspPeekDefinition<CR>
nnoremap <leader>R :LspRename<CR>
nnoremap <leader>r :LspPeekReferences<CR>
nnoremap <leader>o :LspDocumentSymbol<CR>
Finally, we have more custom remappings. These remap useful LSP Features to the leader key, so
<leader>R will present a dialogue box for renaming a symbol and all its uses; <leader>d will
take you to the definition of a symbol and so on.
Linting and Fixing: ALE
Plugin: dense-analysis/ale
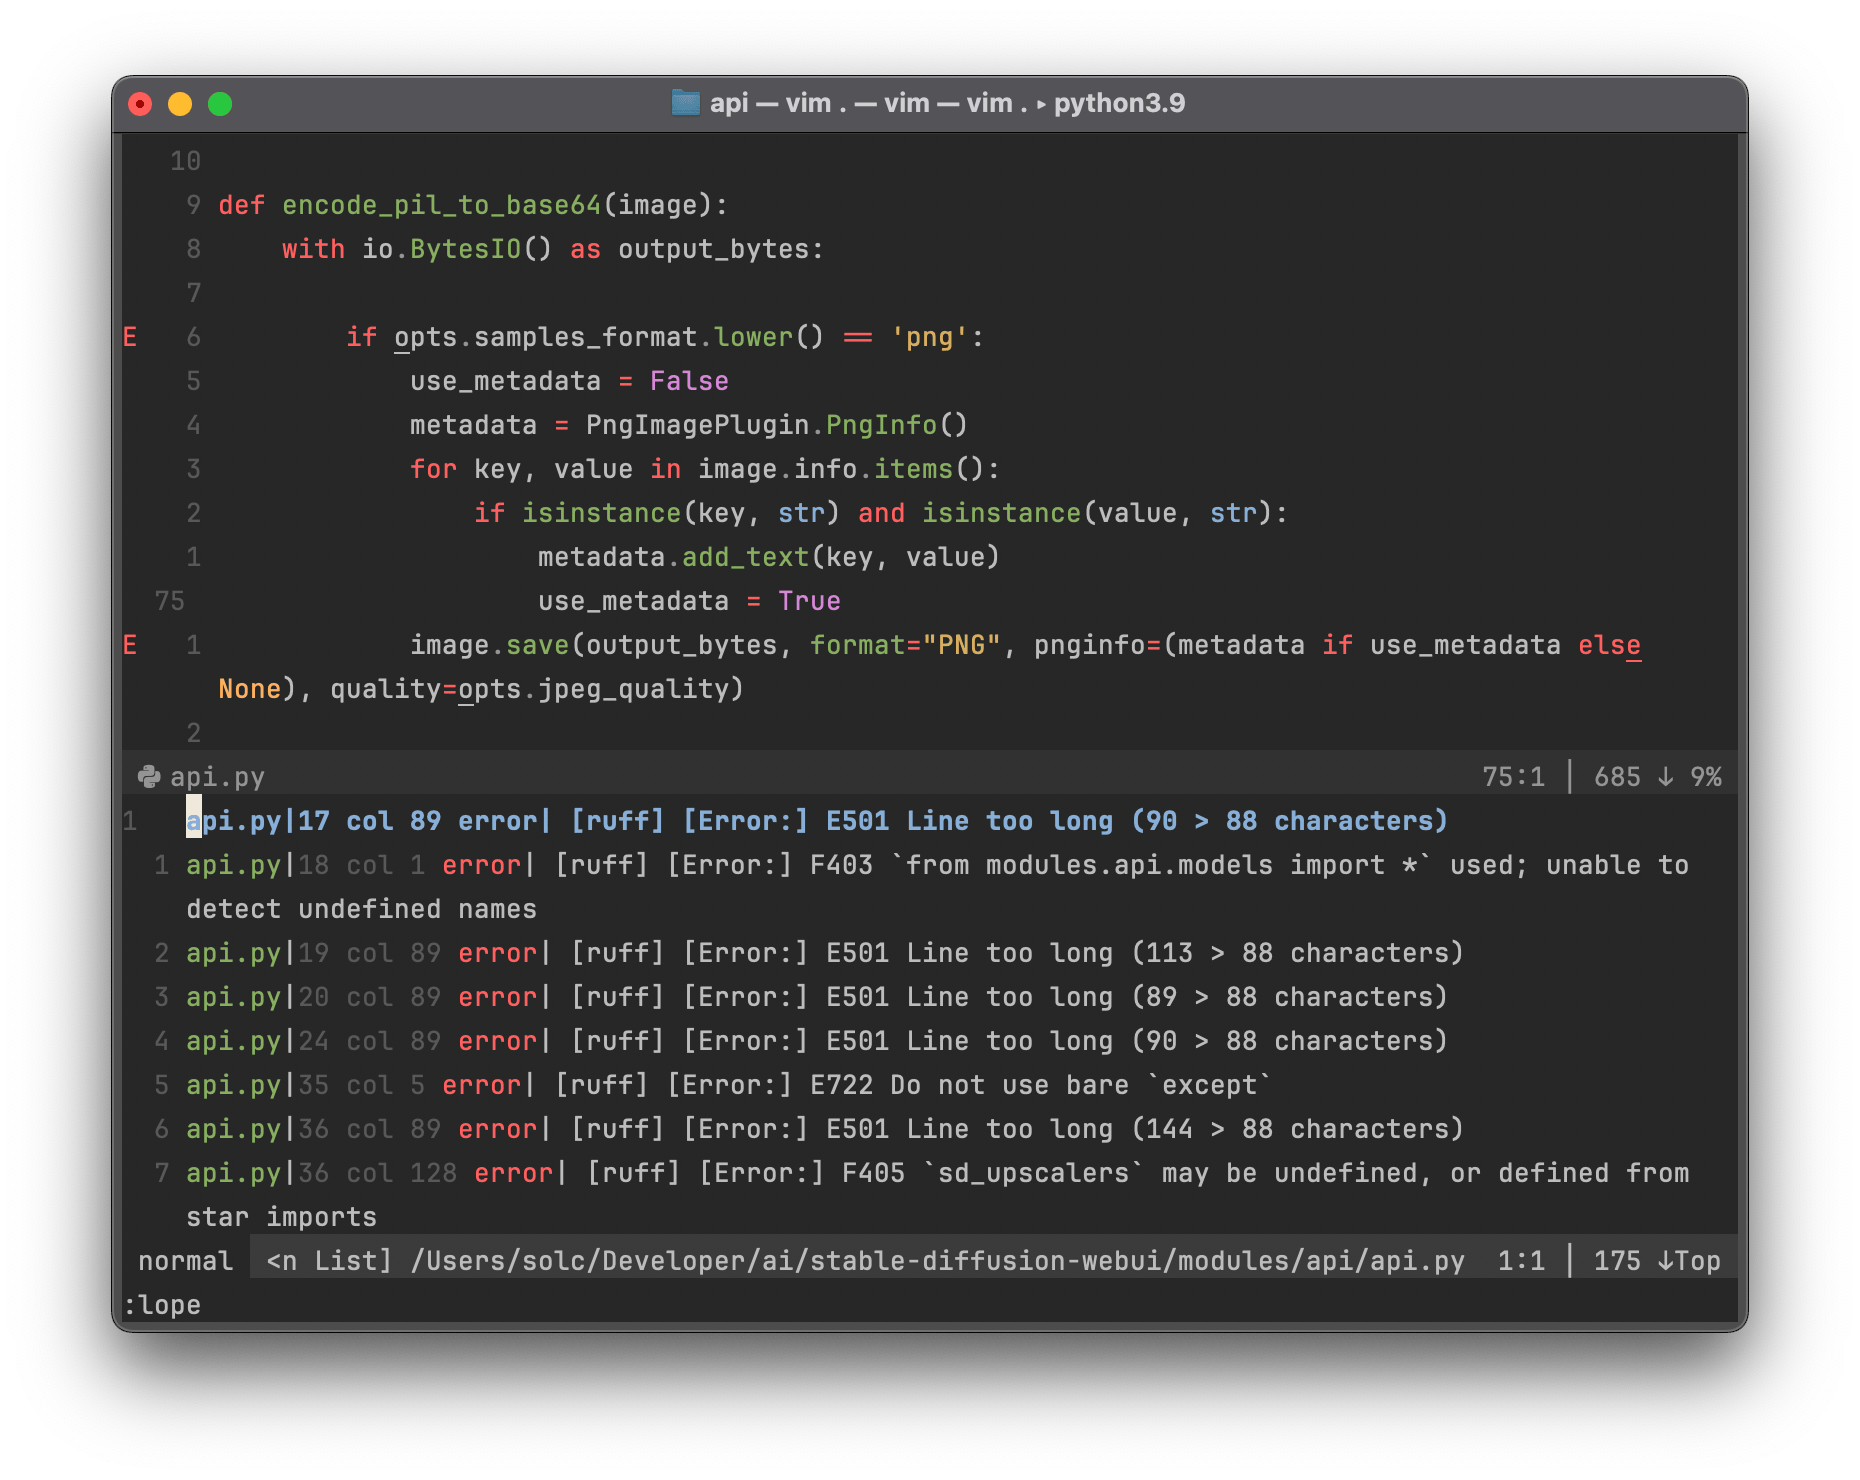
This plugin carries out the Linting and Fixing actions mentioned in the background section. As a result, when errors are found in our code, we will be informed of them via signs in the gutter, highlights on the words themselves, and virtualtext that will appear after the line if the cursor rests upon it and it contains an error. This is vital to catching code mistakes early.
Whilst ALE also purports to bundle LSP features, we elect to ignore those in favour of our standalone LSP plugin above. Again, our configuration specifies examples for Python and Go, but again, much more info can be found in the ALE documentation.
call a:packager.add('dense-analysis/ale')

"--- ALE settings ------------------------------------------------------"
"Disable ALE's LSP in favour of standalone LSP plugin"
let g:ale_disable_lsp = 1

"Show linting errors with highlights"
"* Can also be viewed in the loclist with :lope"
let g:ale_set_signs = 1
let g:ale_set_highlights = 1
let g:ale_virtualtext_cursor = 1
highlight ALEError ctermbg=none cterm=underline

"Define when to lint"
let g:ale_lint_on_save = 1
let g:ale_lint_on_insert_leave = 1
let g:ale_lint_on_text_change = 'never'

"Set linters for individual filetypes"
let g:ale_linters_explicit = 1
let g:ale_linters = {
    \ 'go': ['gofmt', 'gopls', 'govet', 'gobuild'],
    \ 'python': ['ruff', 'mypy', 'pylsp'],
\ }
"Specify fixers for individual filetypes"
let g:ale_fixers = {
    \ '*': ['trim_whitespace'],
    \ 'python': ['ruff'],
    \ 'go': ['gopls', 'goimports', 'gofmt', 'gotype', 'govet'],
\ }
"Don't warn about trailing whitespace, as it is auto-fixed by '*' above"
let g:ale_warn_about_trailing_whitespace = 0
"Show info, warnings, and errors; Write which linter produced the message"
let g:ale_lsp_show_message_severity = 'information'
let g:ale_echo_msg_format = '[%linter%] [%severity%:%code%] %s'
"Specify Containerfiles as Dockerfiles"
let g:ale_linter_aliases = {"Containerfile": "dockerfile"}

"Mapping to run fixers on file"
nnoremap <leader>L :ALEFix<CR>
Much like with the LSP plugin above, we now have to tell ALE what linters and fixers to use for
what filetypes. This is done by the g:ale_fixers and g:ale_linters variables. For python I am a
fan of using ruff as it is extremely quick and can be configured by default in a
pyproject.toml, but you are free to choose from your favourite linters according to the
full list of supported tools.

I won't discuss much of the rest of the config here, as it should be increasingly familiar how
these vimrc configurations work, and the comments outline the purpose of the line sets. However,
for any configuration variables you want to know more details about, it will be good practice now
for you to find said details for yourself in the documentation, either
in the plugins' doc folder
(where you can look to find helper text files in most all Vim plugins), or in Vim itself using
:h ale.
One thing I will mention is the mapping: whilst linting is occurring and reoccurring regularly on
document changes, fixing only occurs on a manual step, and I shall explain why in the next plugin
section. Akin to the JetBrains' CMD-Option-Shift-L for code reformatting, here we specify the
more memorable <leader>l key combination to fix and format code:
nnoremap <leader>L :ALEFix<CR>
QOL feature 1: Auto saving
Plugin: 907th/vim-auto-save
One thing that constantly throws me when moving from a JetBrains IDE to e.g. VSCode is the lack of auto-saving. Let's save ourselves that same whiplash in Vim via this plugin:
call a:packager.add('907th/vim-auto-save')

"--- AutoSave settings ---------------------------------------------"
set noswapfile

let g:auto_save = 1
let g:auto_save_silent = 1
let g:auto_save_events = ["InsertLeave", "TextChanged", "FocusLost"]
Here we disable the swap file, a temporary file Vim saves changes to until they are manually saved, and instead enable silent autosaving every time we leave insert mode, among other events.
QOL feature 2: Auto pairing
Plugin: jiangmiao/auto-pairs
You'd be surprised at quite how much weight this plugin pulls into making Vim feel like a responsive, modern IDE - and better still, we don't need to configure this one to get a familiar experience. Just import it like all the others with
call a:packager.add("jiangmiao/auto-pairs")
and marvel at how much you associate automatic insertion of paired characters with a fast-feeling editor!
QOL feature 3: Git modification indicators
Plugin: airblade/vim-gitgutter
Often whilst using a JetBrains IDE, I'll realise I changed something since the last commit that I
didn't want to change, and I'll click on the little git indicator in the gutter in order to revert
it. This can be done in Vim too with the vim-gitgutter plugin. Again, this one needs no
configuration:
call a:packager.add("airblade/vim-gitgutter")
QOL feature 4: Statusline
Plugin: bluz71/vim-mistfly-statusline
There are many statusline plugins to be had for Vim, but after trying a few, I've settled on Mistfly statusline. It's lightweight, opinionated, and written in vimscript. Although many people will say statuslines are unnecessary, I find they play a large part in reducing cognitive load and increase the ease with which I can use Vim. Mistfly integrates with ALE and GitGutter to show you at a glance what git branch you are currently working on, as well as the number of errors, warnings, and info diagnostics associated with the current file. It also shows you the name of the file you're editing (along with an icon if you install vim-devicons) and the line and column number defining the cursor's current position. We will configure this one ever so slightly:
call a:packager.add('bluz71/vim-mistfly-statusline')

"--- Mistfly statusline settings ------------------------------------------"
"Don't show the mode as it is present in statusline; always show the statusline"
set noshowmode laststatus=2
QOL feature 5: Testing
Plugin: vim-test/vim-test
Another one of the miscellaneous features mentioned in the background section - integrated running of unit tests. We achieve this with the vim-test plugin, in conjunction with the tpope/vim-dispatch plugin for asynchronous running:
call a:packager.add('janko-m/vim-test', {'requires': 'tpope/vim-dispatch'})

"--- Vim Test settings -----------------------------------------------"
nnoremap <leader>tn :TestNearest<CR>
nnoremap <leader>tf :TestFile<CR>
nnoremap <leader>ts :TestSuite<CR>
nnoremap <leader>tl :TestLast<CR>

let test#strategy = "dispatch"
Here we use a handy feature of the packager plugin to visually represent plugin dependencies, but
the result of :PackagerInstall is the same as if they were defined separately - both repos are
cloned as usual.
The remappings enable a quick test workflow, for example: with the cursor on or near a test,
<leader>tn will detect the required test runner and launch it in the quickfix list. Whilst this
is quick, it definitely isn't up to the standards of the nicely laid-out test window I've grown
used to in PyCharm or GoLand - you can't see a tree of tests and filter on failure for instance.
This is one place where I haven't managed to get close enough to JetBrains to be truly comfortable
- if you know of a better system, leave a comment (or open an issue, depending on where you're reading this), I'd be interested to hear it!
Colorscheme
This is one that's entirely personal preference. Take a look on Vim Colour Schemes and see if any call to you. After trying a few I have settled on sonokai:
call a:packager.add('sainnhe/sonokai')

colorscheme sonokai
Bonus 1: Better syntax highlighting
Plugin: sheerun/vim-polyglot
I've left this as a bonus, as it goes against the lightweight plugin rule we've loosely been
adhering to. However, I have found it does improve the highlighting, at least for Python. With Vim
polyglot, substitutions in format strings such as f"{str_var}/var" are highlighted a different
colour to the rest of the string, whereas without it, the whole string is of uniform colour. This
may not matter enough to some people to bother with the big install, so you can choose to include
this one or not.
Bonus 2: File tree
Plugin: lambdalisue/fern.vim
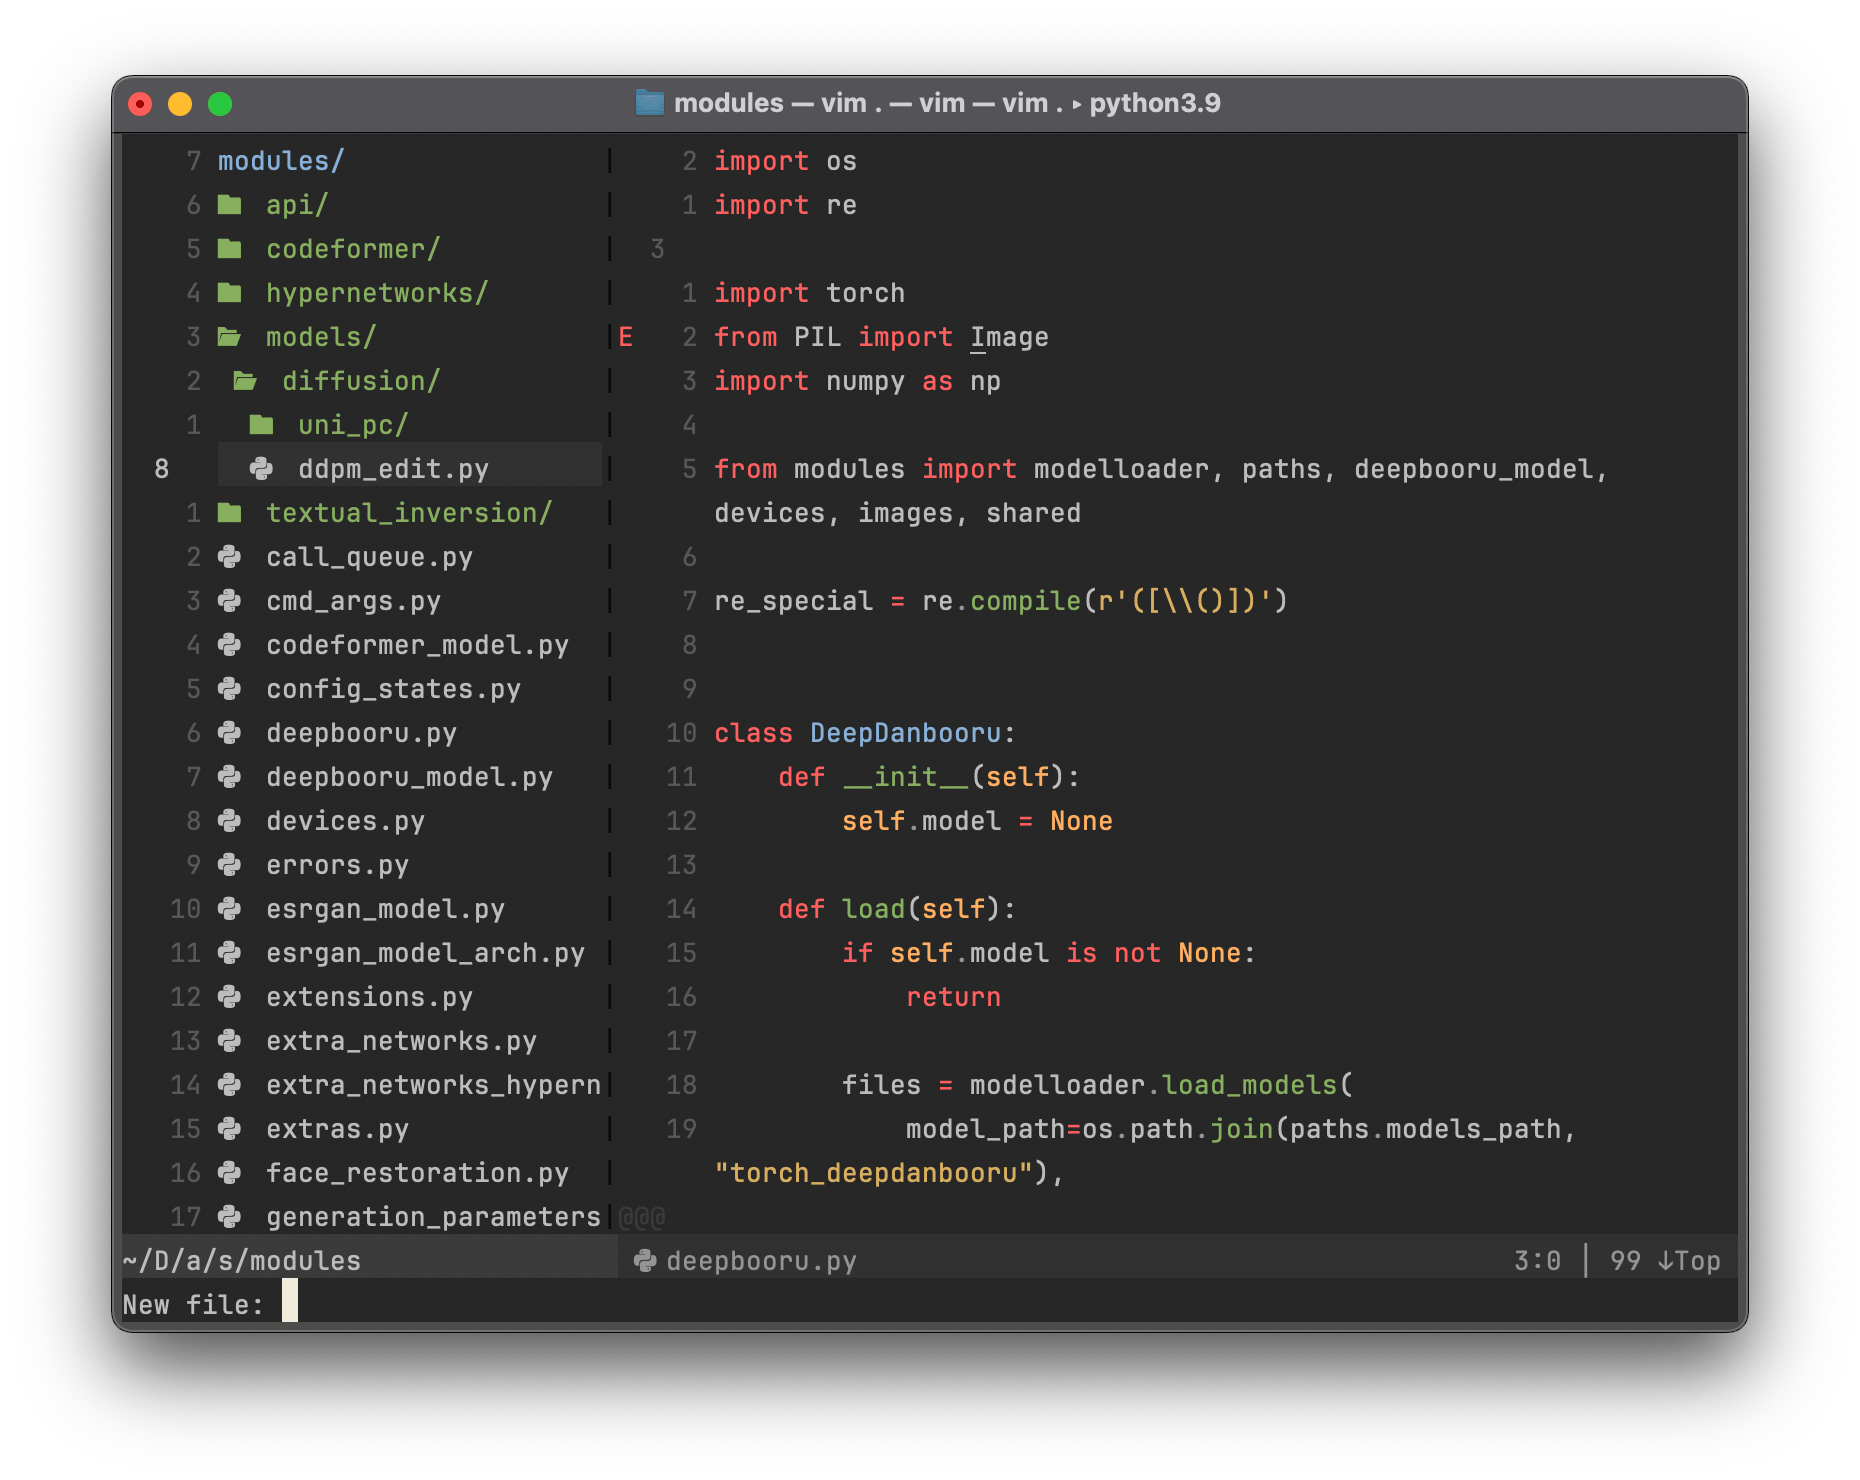
Another bonus, because Vim has a perfectly serviceable file tree already in netrw. If you
search online, many Vim users urge new Vim users to fight the urge to immediately install file tree
plugins such as preservim/nerdtree for this reason. It's
true, if you get quick and comfortable with FZF then you will find those times you require a tree
to come with increasing rareness. However, when working on a big project, or a new project,
filetrees are helpful to begin with to gain an understanding of the layout of the project. So it's
up to you - if you feel you're able to survive with netrw alone, skip this; but if you want the
familiarity of a file tree to fall back on, then add the following to your vimrc:
call a:packager.add('lambdalisue/fern.vim', {'requires': [
      \ 'lambdalisue/fern-git-status.vim',
      \ 'lambdalisue/fern-renderer-devicons.vim',
      \ 'lambdalisue/fern-hijack.vim']})

"--- Fern Filetree settings -------------------------------------------"
let g:fern#renderer = "devicons"
let g:fern#default_hidden = 1
let g:fern#default_exclude = '\%(\.DS_Store\|__pycache__\|.pytest_cache\|.ruff_cache\|.git\)'

nnoremap <leader>a :Fern . -drawer -toggle<CR>
The extra requirements here add filetype icons and git status icons to each item in the tree, as
well as setting fern as the default explorer on opening a directory with vim. The remap specifies
--toggle to hide the drawer when running <leader>a a second time, in order to encourage
eventual independence from the tree.
Bonus 3: Remapping cheat sheet
Plugin: liuchengxu/vim-which-key
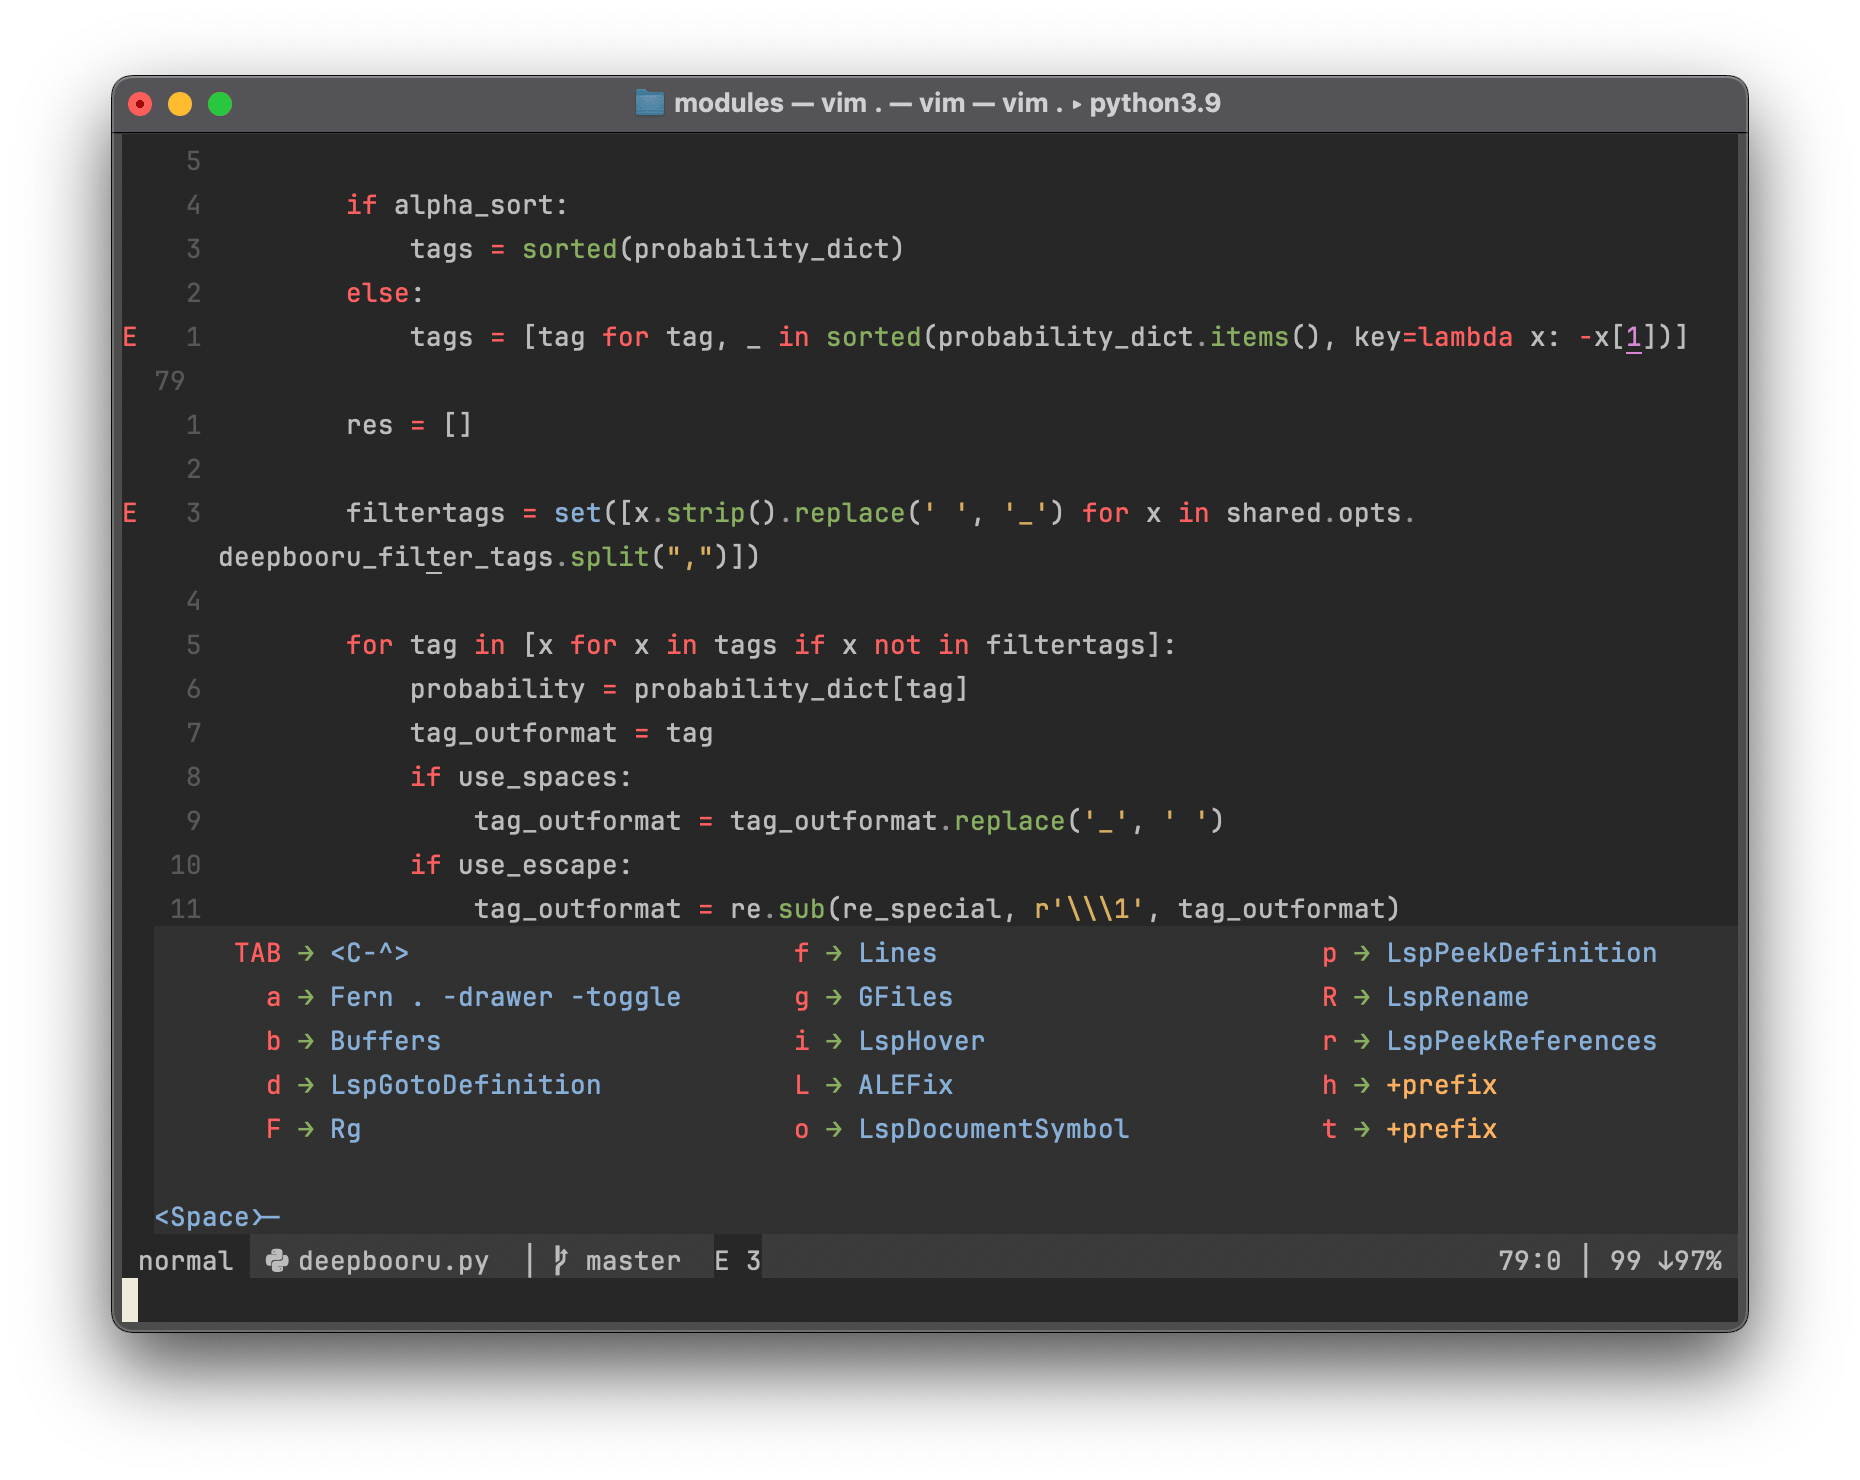
We've made a fair few custom keybinds for our leader key in this config, so how do we go about remembering them all? With a bit of luck, you've followed my advice and incrementally added in each plugin until you feel confident remembering their mappings, but in case a refresher is ever needed, we can use the Which Key plugin to jog our memory:
call a:packager.add('liuchengxu/vim-which-key')

"--- WhichKey settings ---------------------------------------------"
"Put this before any of the other plugin-specific config"
let g:mapleader = "\<Space>"
nnoremap <silent> <leader> :<c-u>WhichKey '<Space>'<CR>
set timeoutlen=200
The first line (that isn't the packager call) informs which-key that our leader key is mapped to
<Space>. We then remap a press of the leader key to bring up the which key menu for all remaps
using the <leader> key. This menu shows up after a certain timeout, which we specify to 200ms
with the final config line.
With this plugin installed, we can press the leader key and then visually explore the keybound options available to us. Eventually unnecessary, but useful whilst we're still getting to grips with our bindings!
Wrap up
And there it is. We now have a workable JetBrains-style setup in Vim. If you want to see the full
vimrc, check out this GitHub gist.
Hopefully it will allow you to start enjoying the fun of this 20+ year old editor!
Further reading
On getting to grips with Vim:
 devsjc blogs //